“Konzept theme” documentation — version 2.5
Table of Contents
- Installing the Theme
- Header
- Pages
- Sidebars and Footer
- Plugins and Shortcodes
- FAQ
- Support
- Sources and Credits
A) Installing the Theme - top
You need a working copy of the newest WordPress installed on your own server (wordpress.com hosting doesn't allow custom themes) in order to start. You should know how to use it (e.g. how to enter admin panel, how to write posts etc.). This may help you: New To WordPress - Where to Start.
Follow the steps below to install the theme:
- Download the theme by going to the "Downloads" page of themeforest.net and finding this theme on your list of purchased files. You can download one of the following on that page:
- All files and documentation. Do not install this ZIP package because you'll receive Missing Stylesheet error message. You can unzip it and inside you'll find "Konzept" folder which contains another ZIP package with installable theme files.
- Installable WordPress file. This is the installable package that you can install.
- To upload and activate the theme go to Admin Panel → Appearance → Themes → Install Themes → Upload and pick the ZIP package with the installable theme files.
- The dark skin is available as a child theme in konzept-child-dark.zip (avaialble only in the "All files and documentation" package) and you may install and activate it as well at this point.
- Install plugins in Appearance → Install Plugins:
- Install Advanced Custom Fields plugin to have an ability to import the custom fields.
- Install WordPress Importer plugin to have an ability to import the demo content.
- Install Contact Form 7 plugin before importing the demo content to have the contact form import as well. Otherwise, it will be skipped.
- Install other bundled plugins.
- Import the Advanced Custom Fields fields in Administration → Ikon Importer.
- Optionally import the demo content by hitting the "Import the demo content" button in Konzept → Demo.
Note: You can also manually import the demo content by importing the XML files available in /admin/auto-install/ in Tools → Import but then the sidebar and the footer will require manual configuration.
Common Installation Issues - top
- Missing Stylesheet — make sure to unzip the package that you downloaded from ThemeForest. Inside you'll find another one with installable theme files.
- Max upload filesize limit — some servers allow only 2 MB files to be uploaded by default (like some versions of localhost WAMP or MAMP and Apache by default). Please contact the server administrator and ask them to increase that. The demo server has this set to 64 MB.
B) Header - top
The header consists of a logo, a menu and portfolio categories filter.
Logo — you can upload your image logo in Konzept → General. It accepts JPG, PNG, SVG and other image formats. If an image is not uploaded, your blog name and description will be used as text.
Menus — you can configure the menu in Appearance → Menus. Attaching a menu to the "Main Menu" location is required.
Portfolio Categories Filter — it lists portfolio categories of the current portfolio page and portfolio categories of the main portfolio page on all other pages. You can set your main portfolio page in Konzept → General → Main Portfolio Page.
C) Pages - top
You'll find all your current pages in Admin Panel → All Pages. Below you'll find a short description of each page.
About Us — you can use the columns shortcodes to create two columns with text. On the demo there are two additional, narrow and empty columns on the sides that make the content a little bit narrower. This reduction is for aesthetic purposes only.
Services — services can be added to "Services" page with the following shortcode: [content_block title="Service Name" icon="t"]Service Description[/content_block]. For more information please visit the Content Block Shortcode section.
Our News — please use the following shortcode to make news appear: [content_block post_type="news" posts_per_page="15"]. News can be added in Admin Panel → News → Add New. News are just an alternative to blog - you can use short news instead of long blog posts. Please note that /news/ slug in the URL is reserved for news archives and can't be used for pages. Please use /our-news/ or other slugs instead.
Coming Soon — it is a Dribbble feed. Please use the following shortcode to load your recent Dribbble works: [dribbble_carousel player="anthonyjones"].
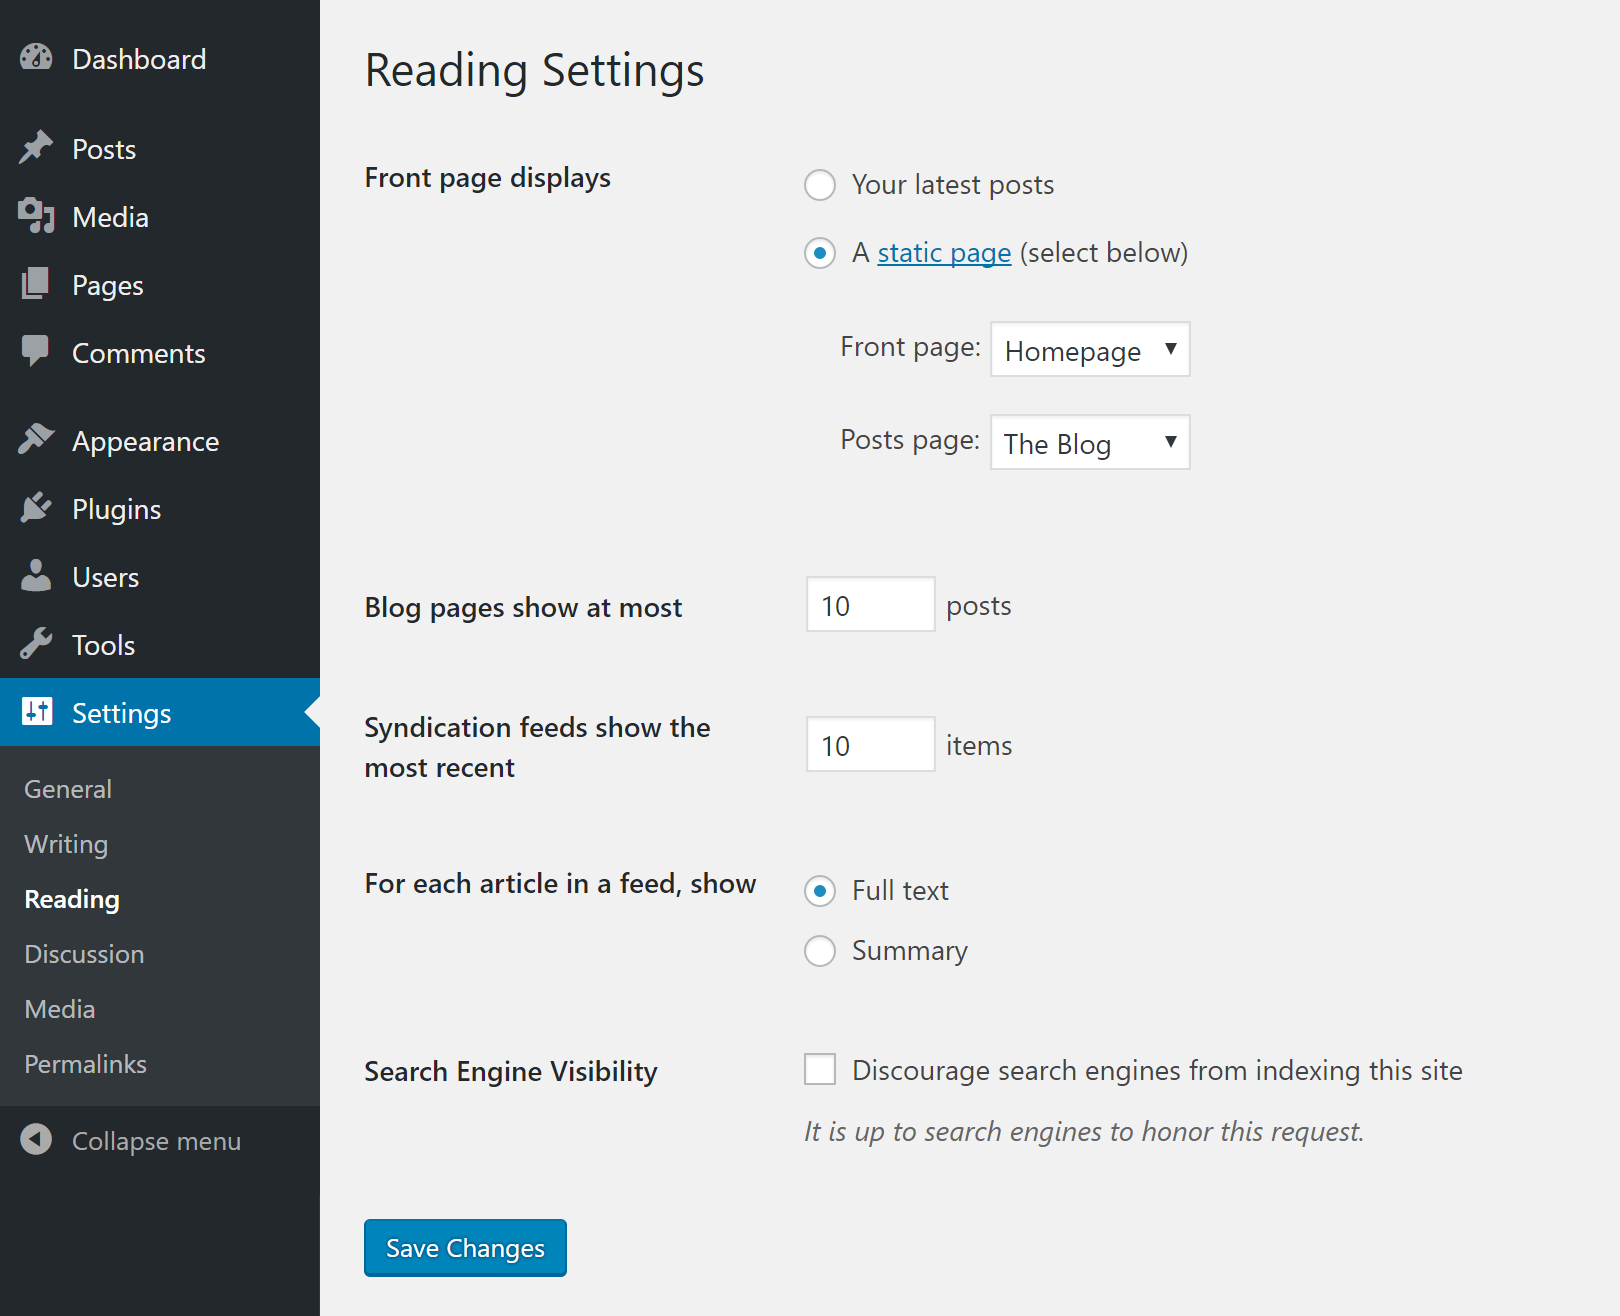
Blog — your front page is a blog by default. You can move it to a subpage using Settings → Reading → Posts page. Your blog page will display full posts with HTML formatting enabled unless you use the more tag. This will produce "Continue Reading..." message and will cut the post. You can also specify a manual excerpt in Posts → Add New → Excerpt and this will be shown instead of the beginning of a post. If you don't see the "Excerpt" box please enable it in the top right corner of the admin panel in "Screen Options".
Contact — you will need Contact Form 7 plugin to make the form appear. You can create a new form and obtain a shortcode that makes it appear in Admin Panel → Contact. You can then paste the shortcode in Pages → Contact or on any other page.
Example contact form:
[text* your-name id:your-name watermark "Name *"]

[email* your-email id:your-email watermark "Email *"]

[textarea* your-message id:your-message watermark 40x6 "Message *"]

[submit "SEND"]
Note: Both new posts and new pages have comments enabled by default. To disable them for both you can uncheck Settings → Discussion → Allow people to post comments on new articles. To disable them for pages only you can do that in Pages → (your page) → Allow Comments. If the box with "Allow Comments" checkbox is not visible please enable it in the top right corner in "Screen Options". You can also update multiple pages at once in Admin Panel → All Pages by selecting them and by picking "Edit" above the list in "Bulk Actions" drop-down menu.
a) Portfolio - top
Portfolio Pages — you can create portfolio pages in Pages → Add New. Each one has to have "Portfolio Template" selected in the box to the right. Once this template is selected and once you save and refresh the page, new options specific to "Portfolio Template" will appear. You can use them to change the portfolio mode between "Thumbnails" and "Text", exclude some categories from being displayed or change order in which works are presented.
Main Portfolio Page (required) — it's required that you select you main portfolio page in Konzept → General → Main Portfolio Page. This page's categories will be displayed in the header on all pages other than portfolio pages. Portfolio pages will display their own categories filter.
Projects — projects can be added in Portfolio → Add New. Each one needs to belong to at least one category. Each project supports images, YouTube videos, Vimeo videos and HTML5 videos. Videos are always fullscreen and images have a few additional modes available:
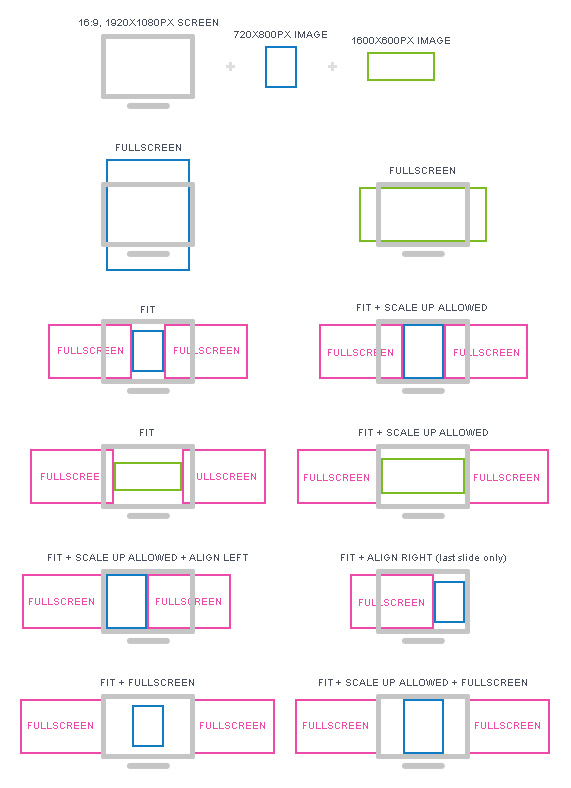
You can pick one of these modes globally in Konzept → General → Slide Classes (default) and all slides will be using this setting. It's a good idea to put "fullscreen" word in that place and all your projects will have fullscreen images by default. You can override this setting for each image individually while creating a slide. So, for instance, some specific images of your choice can have "fit" instead of "fullscreen".
a) Homepage - top
By default your homepage is the blog. You can switch that to a static page or a page with the Portfolio Template selected in Settings → Reading → A Static Page → Front Page. The demo uses a page named "Homepage" as the front page. It's set to have the Portfolio Template and to be the "Main Portfolio Page" in Konzept → General.
c) Featured Slideshow - top
Featured Slideshow is a slideshow that can be displayed on the front page, before your visitors see any other content. You can enable it in Konzept → General → Featured Slideshow. You can add slides in Admin Panel → Slideshow → Add New. Featured Slideshow supports images and HTML5 background videos.
D) Sidebars and Footer - top
Sidebars - top
In Appearance → Widgets you'll find a widget area called "Sidebar 1". Adding widgets to this one will make them show up on pages that have sidebar enabled. You can enable sidebar for pages in Pages → (your page) → Layout.
Footer - top
Please find Konzept → General → Footer Layout in your admin panel. This field accepts a comma-separated list of columns CSS classes. You don't need to know anything about that if you just need it to look like the demo footer.
Creating a footer column creates a new widget area available under Appearance → Widgets. You can create any footer layout and you can use any widgets in footer's columns but as long as the footer is floating over the content there's not much space there. Customization options for the footer are present just in case you wanted to make your footer be taller and be present at the bottom of the content. That's possible with minor style adjustments.
The demo code for Konzept → General → Footer Layout: grid_12 last grid_responsive_only, grid_6 widget_no_margin, grid_6 widget_no_margin last
Text Widget in "Footer 1" in Apperance → Widgets:
Text Widget in "Footer 2" in Apperance → Widgets:
Text Widget in "Footer 3" in Apperance → Widgets: Note: Font Awesome Icons Map.
E) Plugins and Shortcodes - top
Generally, if a plugin exists for something you need, it should be used. Shortcodes, forms, columns, SEO settings, Google Analytics code and similar things need to be added with plugins to have it still working when you switch themes.
This theme requires Contact Form 7 plugin if you want to have a working contact form on the "Contact" page.
a) Columns - top
Multiple columns of content can be added using any plugin created for that purpose but there's also our built-in grid system that is used for footer but can be used for posts and pages as well. Column classes can be added to div elements. Available classes:
- grid_1 — 6.333% column
- grid_2 — 14.667% column
- grid_3 — 23.0% column
- grid_4 — 31.333% column
- grid_5 — 39.667% column
- grid_6 — 48.0% column
- grid_7 — 56.333% column
- grid_8 — 64.667% column
- grid_9 — 73.0% column
- grid_10 — 81.333% column
- grid_11 — 89.667% column
- grid_12 — 98.0% column
- last — always add to the last column in a row.
- row — if you need multiple rows of columns, each row needs to be wrapped in a
divthat can optionally have.rowclass. - row-wrapper — if you need to style your rows differently you may wrap each row in a
divthat has.row-wrapperclass. - grid_not_responsive — hides a column for mobile phones.
- grid_responsive_only — shows a column only for mobile phones.
- widget_no_margin — each widget area in the footer has
3rem(48 pixels) of bottom margin. When you create new footer columns you may sometimes need to eliminate that. It works for desktop computer resolutions only. Mobile phones will always have that bottom margin.
Two columns example:
b) News/Services Slider - top
This shortcode creates a carousel of items. It can display titles, short descriptions and images. On the demo website there are two examples of such slider.
Services page uses the following shortcode for each carousel item: [content_block title="Service Name"]Service Description[/content_block].
News page uses the following shortcode to list news: [content_block post_type="news" posts_per_page="15"]. You can add news in News → Add New.
Available options:
- title — item's title. Space is limited to just a few words.
- description — short description that will appear just below the title.
- link — item can be linked to something.
- icon — a letter that will be changed into an icon. Available icons: Modern Pictograms.
- image — a link to an image that will be greyed out. There is no size limit but images shouldn't much exceed 340x275px.
- arrows_top_position — allows you to move arrows vertically. Default value is
120px. - post_type — name of a post type to fetch posts from. Example:
news. If this is specified other options such as "title", "link", "icon" etc. won't work. - posts_per_page — number of carousel items if "post_type" is specified.
F) Support - top
Visit the support page for this item to find out how to contact us. We will usually respond within 24–72 hours. View the item support policy.
All custom modification should be done in a child theme. The WordPress article covers most of what you need to know about child themes.
The theme is based on Underscores framework which is a set of basic starter files that the default themes use. We use the default WordPress themes as reference as well so you can check their functions.php to see how to unhook filters and actions, learn which files and functions can be overwritten (presentational) and which can't (core) etc.
G) Sources and Credits - top
Big thanks to all the great designers who have provided preview content for Konzept.
- Guilherme Villar
- Anthony Jones
- Pavel Pavlov
- Suprematika
- Vanessa Gong
- Alexander Laguta
- Kostadin Kostadinov
- Sergey Shapiro
- Shaun Moynihan
- Nimax
The designers listed above agreed to use their works as preview content for the demo website but these works can not be used elsewhere. They are not included in the package. Thank you!